Tuesday, August 18, 2009

5 Secrets of the Photoshop Crop Tool

If you’re used to clicking the crop tool dragging the tool over your image and pressing Enter, it may surprise you to know that there are other options that you can use when cropping inPhotoshop.

Here are my five “best-kept secrets” of the Photoshop crop tool.

before_after.jpg


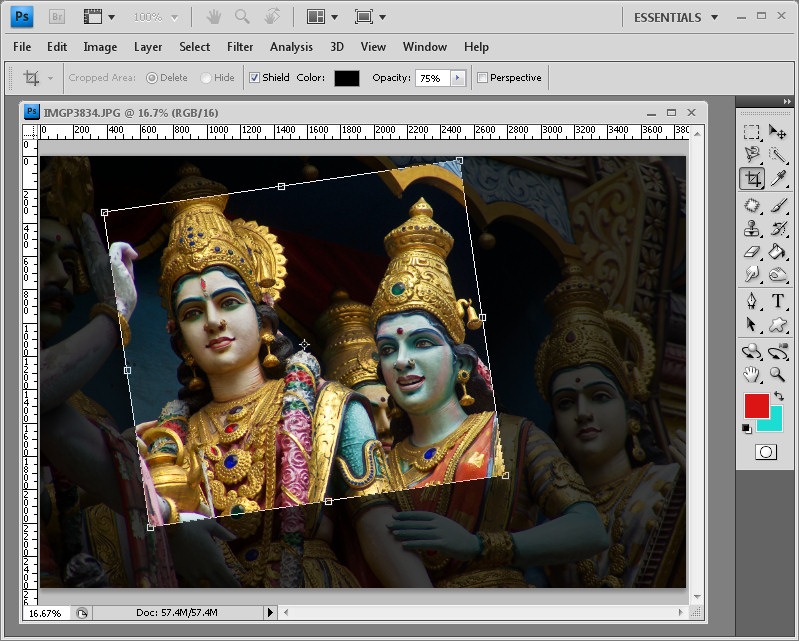
1. Rotate as you Crop

When you drag the crop marquee over an image, you can rotate it by letting go the mouse button and drag on one of the corners of the marquee to rotate it. When you double click you will rotate and crop the image at the one time.
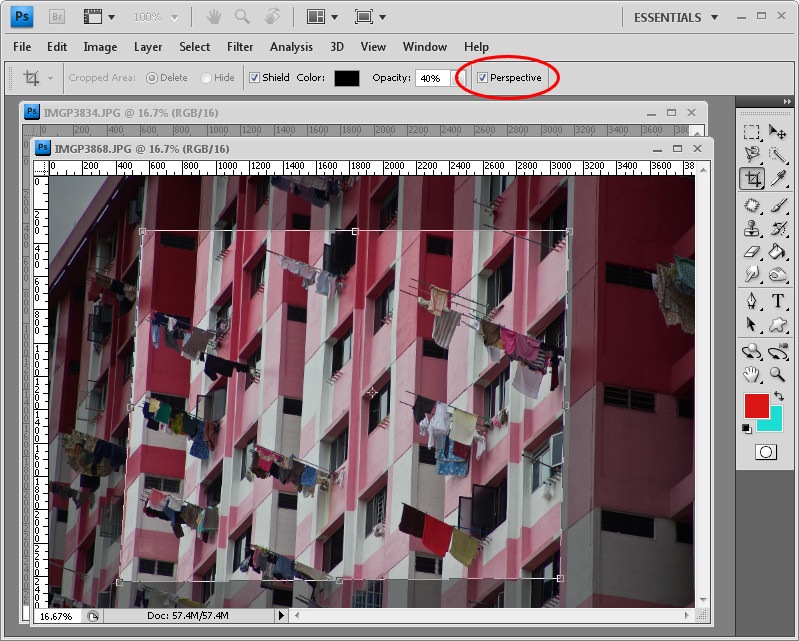
step1.jpg


2. Perspective Crop

You can fix perspective at the same time as cropping by first dragging a crop marquee over the image. Let go the mouse button and click the Perspective checkbox on the toolbar. Now when you drag on a corner of the marquee the corners move independently of each other allowing you to position the marquee along the lines you want to crop to in the image. When you crop the image it is cropped and distorted to create a rectangular image. You can use this to fix distorted perspective in your images.

step2.jpg


3. The Crop that’s not a Crop

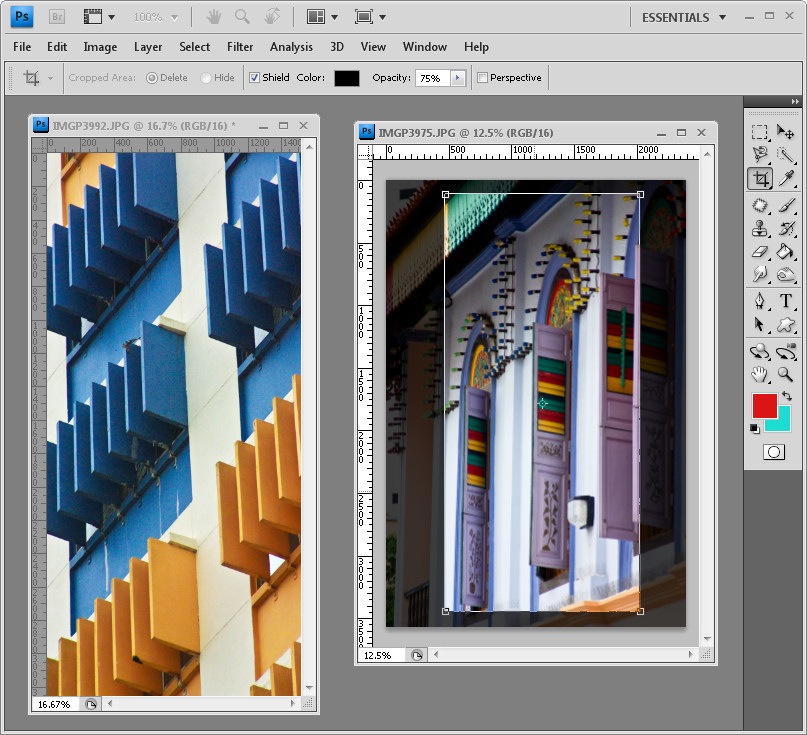
Once you have selected an area to crop, you do not actually have to crop it, and you can, instead, simply hide the cropped area rather than permanently deleting it.

step3.jpg

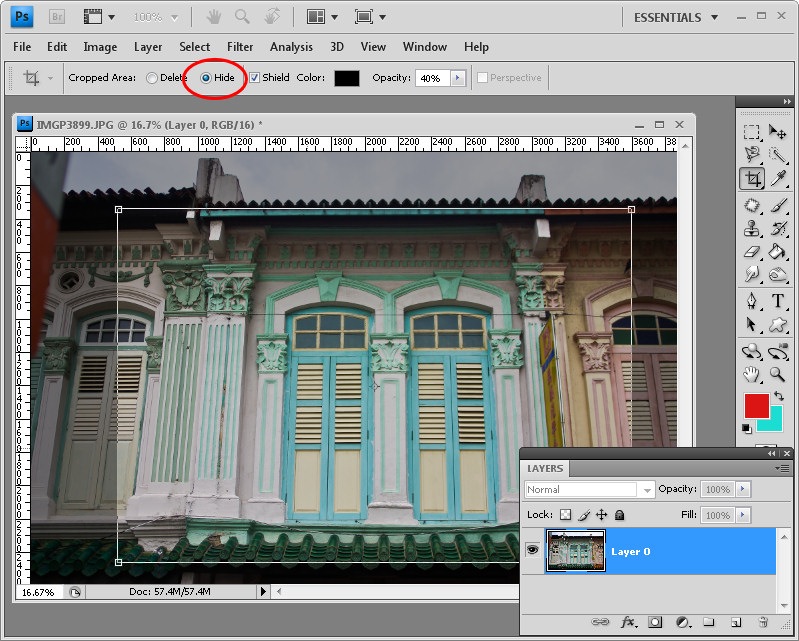
To do this, you need to be working on an image layer and not the background layer so double-click the background layer and convert it to a regular layer. Drag a crop rectangle over the image and from the tool options bar, select the Hide option. When you double click the cropped area will be hidden but still accessible.

step3a.jpg

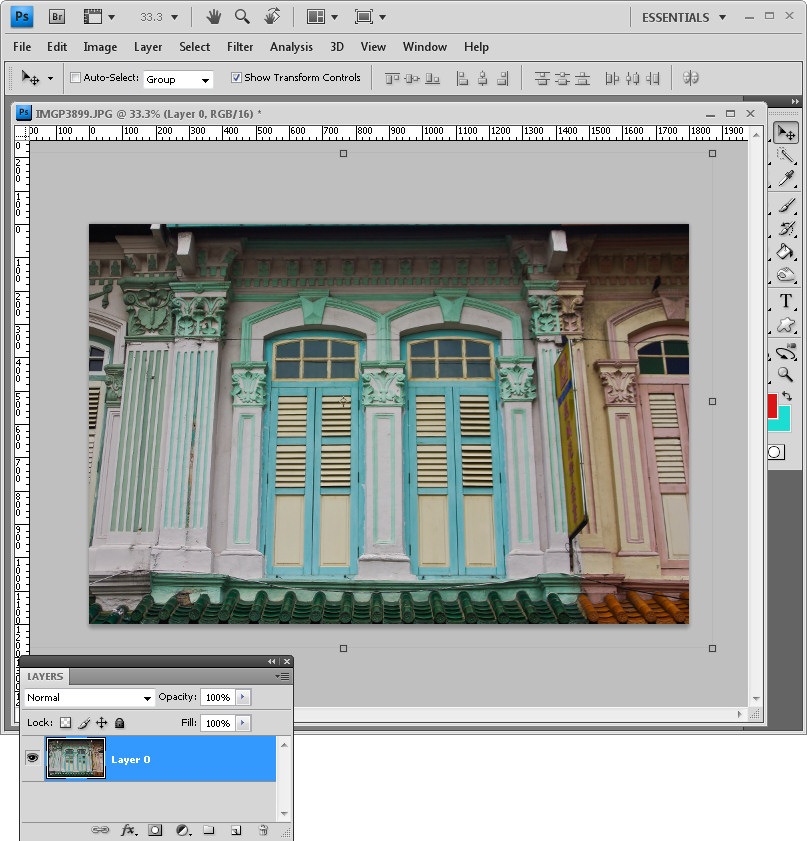
You can now select the Move tool and reposition the image inside the area that you have cropped it to. This is useful when you want to crop an image to 4 x 6 in size and you want to experiment with different ways to compose the image within this area.


4 Create and Use Crop Presets

step4.jpg

When you click the Crop tool you can choose from various presets by clicking the dropdown list to the immediate right of the tool in the tool options bar. Click a preset and drag on the image to create the crop marquee. You can turn a portrait crop to a landscape one (or vice versa) by selecting the preset, drag over the image and then rotate the marquee ninety degrees by holding the Shift key as you do so to constrain the rotation to multiples of 15 degrees.

step4a.jpg

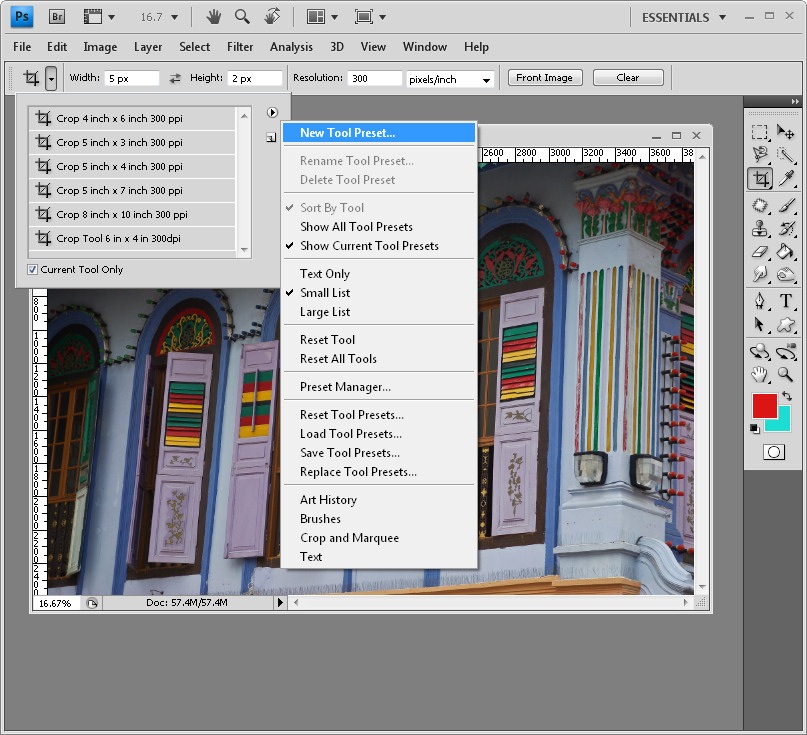
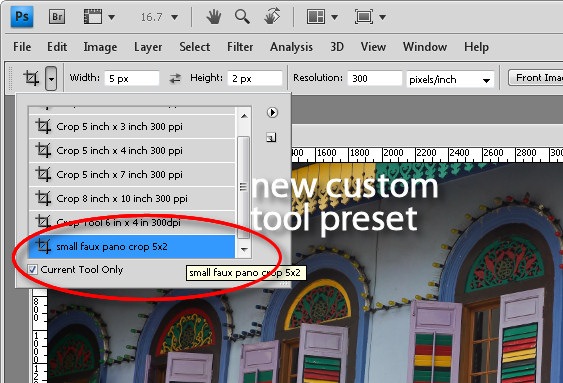
To create your own preset, set the width, height and resolution in the tool options bar and then click the fly-out menu for the crop tool and select New Tool Preset. Give your preset a name and click Ok. It will appear at the foot of the presets list and you can select and use it anytime in the future.

step4b.jpg


5 Crop to the Same Size

step5.jpg

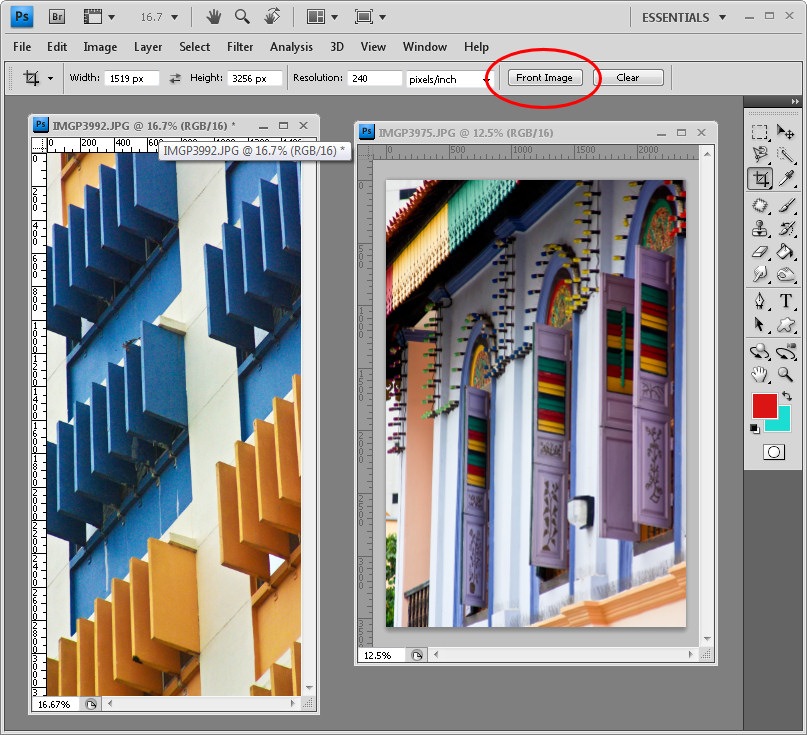
To crop two images to the same size, select the Crop tool and make active the image you want to match the size of. Click the Front Image button on the tool options bar to configure the Crop tool with the dimensions of the front image.

step5a.jpg

Select the image you want to crop and drag a crop rectangle over that image. When you double-click to finish, the image will be cropped to the same size and resolution as the original image - in some situations this may mean that the image will have increased in size.

Warning:

If the Crop tool isn’t working as expected, press Esc to exit the tool and click the Clear button to reset it - some settings are sticky and you may not remember you had set it to special crop settings earlier in an editing session.

step6.jpg

Next time you go to crop an image, remember that there are more options for the crop tool than may initially meet the eye.


Sunday, August 16, 2009

Graphic design - Post 1

This is a tutorial that will cover some of the techniques I use to create a design for further use in purposes like - web design - graphic design or prop design.

graphic   design

So let's create a document first.

graphic design

Cover the image with black with maybe a little gradation.

graphic design
Click image to expand.


I'd like to use a photo of some texture in this one so I will find one in the internet:

graphic design
Click image to expand.


Apply the texture and do use wave filter to change the planar profile of this picture.

graphic design

With also lighten amount: Flip the image and here is the current result:

graphic design

Follow along with shear filter:

graphic design


graphic design

Result:

graphic design

Continue with the effects and apply motion blur filter.

graphic design


graphic design

Now use this square brush to do some of this.

graphic design
Click image to expand.


graphic design
Click image to expand.


Create
a new layer - set it to overlay and use some of this brush too.

graphic design


graphic design
Click image to expand.


Now another layer: this will help us to reach the feel of depth in the picture.

graphic design

Experiment with opacity and flow jitters too.

graphic design

Use soft brush and the same overlay brush mode to expose the colors.

graphic design
Click image to expand.


Merge all the layers together and blur the background with blur tool or using masking technique.

graphic design

Use these brush settings.

graphic design


graphic design

Now some text - just plain effect with I letter covered with blue.

graphic design
Click image to expand.


Create a copy and motion blur it:

graphic design


graphic design
Click image to expand.


Add saturation to the upper part of the image.

graphic design
Click image to expand.


graphic design

And this is it : happy design making and see you next time.

graphic   design

Download brush: Wreck.abr

Tuesday, August 11, 2009

Beginner's Guide To Adobe Photoshop

Ever wanted to learn how to use Adobe Photoshop, but had no idea where to start?


Most Photoshop tutorials for beginners are really for people who are already familiar with the program. This tutorial goes right back to the DAWN OF TIME! ...and is designed to help Photoshop beginners.


This basic, thirty-minute course is not a comprehensive instruction manual. It only gives you the very basic features you need to know to start using Adobe Photoshop. From there, you'll quickly discover most of the other features of the program.


The images in this tutorial are from Adobe Photoshop 7.0, but they're very similar to those from other versions of Photoshop.


1 - Creating a New Image, and Setting Adobe Photoshop's Undo Option

Click File > New, and create a new image of any size you desire.


Press Ctrl+K to bring up the Preferences window.


Change your "Redo Key" to Ctrl+Shift+Z. This enables you to press Ctrl+Z while working to undo your last actions. Remember this.


2 - Using Adobe Photoshop's Layers window

The Layers window shows the various layers that your image is made up of.


To make a new layer, click the New Layer button, as shown here.


To work on a different layer, click on that layer. The eyeball will apear next to that layer.


You can drag layers up and down the list.


Remember ? create a new layer for each part of your image. This allows you to go back and edit the layers individually. Every Adobe Photoshop beginner at some time makes a masterpiece, only to find out that they did it all on one layer, and now they can't remove those pink clouds they put on it.


Selection And Manipulation


3 - Learning about Selection

One of the most important concepts in Adobe Photoshop is Selection.


This is the Rectangular Selection Tool.


Use this tool on your image to select an area of the image. This lets Photoshop know that that's the area you want to work on.


4 ? Adding to a Selection and making a square

To add to a selection, hold Shift before dragging.


To make the selection exactly square, start dragging, then hold Shift.


You can press Ctrl+D to "deselect" and remove the selection at any time.


5 - Elliptical Selections and subtracting Selections

Hold down on the Selection Tool on the Toolbar, and choose the Ellipse.


To move the selection, just click inside it and drag.


Holding Alt while selecting subtracts that area from the selection. I've done that with the Ellipse Selection Tool.


6 - A Selection exercise

If you're following this tutorial in Adobe Photoshop, see if you can make these shapes.


Other relevant Adobe Photoshop tools


Lasso Tool ? Allows you to draw a selection area with the cursor.


Magic Wand ? Summons elves. (Also believed to select an area of one colour)


Colouring Your Selection


7 - Choosing a colour

Now that you know how to select an area in Adobe Photoshop, we can look at some tools that can do something with that area.


Before we get started on colouring your selection, you'll need to pick a colour.


This part of the Toolbox is where you select your colours.


The top square is the foreground colour. If you use a brush or paint bucket, it will apply this colour.


The bottom square is the background colour. It has various purposes, but it's also a good place to store a second colour that you're using.


Click on either square to change its colour.

Click the arrow to swap the two colours.

Click the little squares to reset the colours to black and white.


8 - The Paint Bucket and Gradient tools

These two tools are on separate buttons in Adobe Photoshop 5.0, but share a button in Adobe Photoshop 6.0 and Adobe Photoshop 7.0. To select one, click and hold.


On a new layer, just click the Paint Bucket tool inside the area of your selection to fill it with the colour you've selected.


Click and drag from one area to another to fill the area. The point where you started to click will be the colour of your foreground colour, and the point where you took your finger off the mouse button will be the colour of your background colour. The area in between will gradually change from one colour to the other.


In this case, I went from corner to corner, with the default white and black selected.


9 - A colour exercise

With what you've learned so far, you should be able to recreate this piece of hippy history.


Remember to create each step on a new layer.


Other Adobe Photoshop tools of interest include


The Text Tool ? Just click it wherever you want text to appear. Choose a font, colour, and size, and start typing.


The Move Tool ? Use this tool to drag things around. If you have a selection, it will drag the contents of the selection. If not, it will drag the contents of the layer you're on.


Blending Options And Special Effects


10 - Adding Effects

Now that you know the basics, it's time to start adding some easy special effects.


To demonstrate Adobe Photoshop's special effects, here's an unembellished button for a website.


Each part of this image is on a separate layer.


11 - Key Adobe Photoshop Blending Options


In the Layers list, right-click on a layer, and select Blending Options (Adobe Photoshop 6.0 & Adobe Photoshop 7.0) or Effects (Adobe Photoshop 5.0.)


This is a picture of the left-hand portion of the Blending Options window that will appear. (The window is much smaller in Photoshop 5.0.)


Drop Shadow

Selecting this option will make your layer cast a shadow on layers below it.


Bevel and Emboss

Makes the layer like a block of gold bullion - raised in the centre, with edges that slope down. (This is a good effect for creating buttons.)


Texture

Makes the surface of the layer look like it's made of wood, stone etc. Use the "Overlay" setting.


Stroke

Stroke is just another word for "outline". A Stroke is useful to make an object stand out from its background. (In Adobe Photoshop 5.0, this option doesn't exist. Use Outer Glow as an alternative.)


12 - The end result


Other than using some of the Blending Options, nothing else has been done to this button.

It's really that easy.


A final few Adobe Photoshop features


Zoom: Press (Ctrl and +) to zoom in. Press (Ctrl and -) to zoom out. This is very useful if you're a bit of a pixel pirate

Transformation: To Transform (resize/rotate/distort) an object, press Ctrl+T. To Transform a selection, click Select > Transform Selection. Use the Shift key while transforming to stop the image distorting.


"Special Message"

I hope this tutorial has helped you get the idea of Adobe Photoshop. You can now face the "wall of random icons and palettes" with confidence.


Happy Photoshopping!